Nature Walks Course 2019
February 14, 2019
16:38 PM
Just in case there is anyone out there wondering.
Our Nature Walks course dates are filling up.
Nature Walks with Colm will take place in 2019, in Spring and Autumn, some places are still available
There will be one in Spring:
• Arrive Thursday 2nd of May, Depart Tuesday 7th May.
The Second course starting on May 16th is now full.
There will be two in Autumn
• Arrive Thursday 26th September, Depart Tuesday 1st October.
• Arrive Saturday 5th October, Depart Thursday 10th October.
The courses will include Bed and Breakfast and a light lunch for the four days of the course and dinner cooked by Martin for the five nights you are with us – Aperitif, Starter, Main Course, Cheese, Dessert and Coffee served with the delicious wines of the Languedoc.
For the Nature Walks we can pick you up at Carcassonne Airport on the day of arrival and bring you back there for your flight home. You do not need a car as we will organise your transport to the various walks.Each of these courses will cost €775 per person sharing with a single supplement of €100.
For any further information contact us at:
martin@martindwyer.com
My Father’s Figures
February 14, 2019
11:17 AM
One of the joys of old age is that sometimes- for no particular reason- a little thought,or incident, from the past drops into your mind from nowhere.
This happened yesterday while I was doing a sudoku and drawing the figure five, carefully, in a little box.
I was the youngest of a family of seven children so consequently between the age of about 2 and 6 I was alone with my mother while the others were at school. I was spoiled, as they say, rotten- but I now realise that my mother enjoyed these times quite as much as I did- which was of course why I wasn’t sent to school until I turned six.
These mornings with my mother were great times for tete a tetes. My father was at this time managing director of Dwyer and Company an enormous wholesale warehouse/ manufacturing company in Cork and I knew, from visits to “the warehouse” with my mother that he was held in great reverence, at that stage anyway, there.
One day I asked my mother, in genuine curiosity, why was our father manager of all those people. My mother, caught short and not keen to point out that it was a (more or less) inherited position grasped at straws and said it was because he was “very good at figures”- this I was happy to accept as one of my major efforts at that stage in life was to make beautiful letters and numbers. Obviously, I realised, that if I made really beautiful numbers- like my father did- I would go far.
For many years, even after I started school, I tried to emulate my fathers script and strangely now, sixty something years later I can see the ghost of his handwriting in my own, and remember, all these years later, how I tried to copy the way he made the figure five.
Celebrating a dry year
September 18, 2018
16:15 PM
It was, as most of you probably know, this day last year when I had my last glass of wine.
I have been amazed at the amount of friends who have muttered to me that they would love to try it out.
For this reason (or to explain the unlikely scenario of me being sober) I offer you all my own personal 10 point plan for becoming alcohol free.
10 Crutches to help to give up alcohol:
1.Drink fancy, when every one is tucking into a G&T decide on your own cocktail and drink it from a special glass. Make the drink with all the ceremony you can. Tonic water with ice is a good start and non-alcohol beer another. Avoid drinks like Coke or sweet sodas, the sugar makes you feel ill after a bit.
2. Have lots of good coffee handy and have a system that will produce a single cup for you, have this in place of the drink, caffeine has a wee buzz too.
3. If, like me, you always guzzled wine with meals you are going to need a substitute. Non- alcohol wine (unlike non-alcoholic beer) is a bit of a disaster but I find apple juice and white grape juice good especially if diluted with sparkling water. At the end of the meal have a strong coffee.
4. You will have some money which you would have spent on alcohol to spare ( so long as you don’t go ape shit on fruit juices)- use this for a specific treat- to feed one of your hobbies (I buy antiques.)Or stash it like the Mitfords to have a a running away fund or use it to buy unsuitable clothes – not using it to buy alcohol means it is yours to fritter as you want.
5. If you are thinking about giving up but are not sure, do what I did and give it up for a month ( I did November for about 12 years) You will have the first of the next month to look forward too and if it wasn’t TOO hard you can always stretch it.
6. If you are the kind of person who can really stop after two or three and never make an asshole of yourself then, fair dues to you, you really don’t need to give it up. I always fooled myself that I was, but the truth was that after two or three I no longer cared.
7.Go out to fancy restaurants for dinner instead of the pub- go on, you can afford it now, especially when you are not buying wine a fancy restaurant prices.
8. Tell everyone, and talk freely and honestly about quitting. People will close up like clams when you refuse the wine and drink water and assume you are hanging for a drink. Reassure them.
9. If you can use it as an aid to lose weight, giving up alcohol means you are half ways there anyway so the extra shove is not a push too far- and anyway you will have lost the ambition to lash into the fridge late at night- after a feed of pints- when you will have over indulged only on sparkling water.
10. Congratulate yourself constantly on succeeding in giving it up and when some kind friend says “Aren’t you a great man now”
Agree with them, because I am telling you,
you are.
Superbe étape
July 18, 2018
18:02 PM
Here is a superb review from a French family who were with us last week.
I blush, but not too much.:
Superbe étape
Malgré une situation un peu acrobatique pour accéder au Presbytère en plein cœur du charmant village ,ça vaut vraiment le détour. Il y a une petite place à proximité pour le parking ,avec un peu de chance ..! !
Formidable accueil de nos hôtes irlandais ( Martin et Sile ) dans cette très ancienne demeure parfaitement réhabilitée.
La table d’hôte, servie en terrasse surplombant le village, est digne d’un très bon restaurant , avec une cuisine raffinée concoctée par Martin .
Petit déjeuner royal ;..que du bonheur ,et ne vous inquiétez pas , nos hôtes parlent très bien français
L’hébergement est tout à fait correct ; à noter toutefois pas de Tv pour les accros ;mais wifi sans problème
A renouveler sans hésitation.
For my monolingual friends here is a (only slightly corrected) Google translation of the above.
Superb stopover,
Despite a somewhat precarious situation the Presbytery, in the heart of this charming village, is really worth the trip. There is a small square nearby,where with a little luck ..! ! you will find parking,
Great welcome from our Irish hosts (Martin and Sile) in this,perfectly restored. very old house
The table d’hôte dinner, served on the terrace overlooking the village, is worthy of a very good restaurant, with fine cuisine concocted by Martin.
Wonderful breakfast; such happiness, and do not worry, our hosts speak very good French
The accommodation is absolutely correct; note, however, no TV for addicts, but wifi without problem
To revisit without hesitation.
Myrtle
June 26, 2018
14:32 PM
.jpg)
Surprise award for Myrtle from Euro-Toques.
She is much missed
It might as well be Spring.
April 10, 2018
10:35 AM
.jpg)
Spring is slow in coming to the Languedoc this year, coming in fits and starts but I can forgive all when we are granted a peach of a day like today.
Even the vine knows summer is coming.
All Together Again
April 9, 2018
09:25 AM
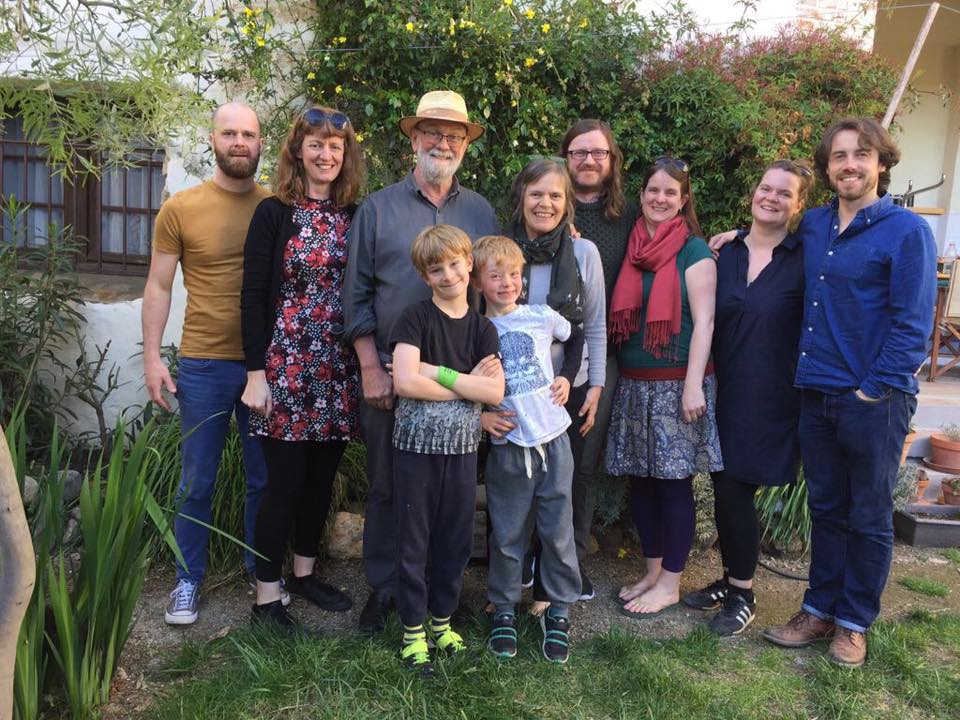
Thanks to Eileen and Phil making a surprise visit we were all together for Easter.
Better
April 9, 2018
06:34 AM
For the last three or four weeks Síle and I have been taking a daily stroll down the valley road, then through the vines, up around the cemetery and home. One of the reasons this route was picked was because it is littered with convenient benches where I could (and did) take breathers. Today for the first time I felt healthy enough to pass the benches without stopping. While I was congratulating myself on this a car stopped by us, it was one of the village nurses who had taken such good care of me for the first few weeks after hospital.
“Ca Va ?” he enquired.
I answered truthfully ( if a little ungramatically) “Je suis Top !”.
He grinned and drove on.
Truth is that I am truly feeling great, marvellous feeling after six weeks of being under the weather.
Ippy Dippy Dation, My Operation 2
April 6, 2018
10:20 AM
For the non squeamish among you I now, as promised, bring you up to date with my recent medical history. The squeamish or modest among you may turn your heads away.
Ippy Dippy Dation, My Operation 2
It is now just six weeks since I left hospital after my various operations so for anyone who is interested here is the continuing saga.
I had developed an infection in my kidneys from operation one on the prostate which had led to operation two and a drain to my back from the kidneys which Dr.S told me he would remove in his surgery six weeks later.
In the meantime I was home under the care of the local nurses (three very competent men) who visited every day to change dressings and generally keep an eye.
I must confess to not feeling great, the energy levels were at a low ebb, it turned out that I was suffering from another urine infection for which I was prescribed another antibiotic so it was hard to tell whether the lack of form was post operation or caused by the infection or the antibiotic.
However after about two weeks the energy levels started to rise and I started to do a short daily walk without exhaustion- just as well really as most of our family, two daughters, their partners and our two grandsons were arriving for Easter for a long planned holiday.
Strangely it was while they were here with us that I began to feel fully healthy again, and my appetite and sleep patterns began to return to normal.
So family Easter was great, middle daughter Eileen and partner Phil managed to do an unscheduled week-end visit so we were all together for the holiday.
I was aware however that there was still one final act to be performed. The removal of the drain from my kidneys which was scheduled to happen yesterday in Dr. S.’s surgery.
Rather to my surprise I was called from the waiting room there not by Dr.S but by a nurse who brought me to a small consulting room where she asked me to remove my trousers and unders- again a little to my surprise as I imagined that the drain was going to be removed from my back where it had had its outlet (now healed over). Her next actions surprised me even more as she proceeded to wash my penis with sterilizing swabs, and further injected the same long suffering member with a gel and furthermore sealed off the top with what was the first cousin of a clothes peg.
Then she abandoned me for about fifteen minutes.
Not that I was completely alone, various nurses passed through the room from time to time, all had a friendly greeting and three weeks of urology have completely destroyed the Dwyer modesty so that I felt not a whit of shame at being abandoned on my back for all to see with a clothes peg on my willy.
Next arrival was Dr. S himself, who took off the clothes peg, and proceeded to take out of its sterile bath a long black complicated tube which I was to discover was in fact a camera.
It was then that I realised that in fact the probe was not going to come out through my back but through another orifice altogether.
It was then when I also realised that the gel which the nurse had inserted into my penis was anaesthetic as I felt absolutely no pain as the camera proceeded to make its way to my kidneys. The screen which Dr.S was using to guide his work was directly above my bed so I had a total and fascinating view of the cameras journey. Eventually they came upon the probe which the camera was cleverly able to attach to itself and the camera and probe was gently and painlessly pulled out. I can’t remember ever having been as fascinated as I was with the show.
Dr.S was content with the process, told me to comeback in three months for a check-up and that he was putting me on a preventative antibiotic as a precaution for the next two weeks.
Cheese Soufflé for two.
March 13, 2018
22:02 PM
|
.jpg)